Wednesday, 31 August 2016

Underground cables


In previous post, we learn how underground cable wiring are done with procedure. underground cables comes with variety of types and strong insulation to prevent cables from damaging. These cables aren't complicated because this cables only transmit or send electricity from one place to another place,but these cable has it's own voltage rates to transmit. So lets look at it.

A underground cable comes with different insulation. This is because the cable must prevent damage from chemically,mechanically, and toxic gas that can damage the cable insulation.

Function of underground cable insulation :

Conductor :
Core or Conductor A cable may have one or more than one core depending upon the type of service for which it is intended. The conductor could be of aluminum or copper and is stranded in order to provide flexibility to the cable.

Insulation : 
The core is provided with suitable thickness of insulation, depending upon the voltage to be withstood by the cable. The commonly used material for insulation are impregnated paper, varnished cambric or rubber mineral compound. 

Metallic Sheath
A metallic sheath of lead or aluminum is provided over the insulation to protect the cable from moisture, gases or others damaging liquids

Bedding
Bedding is provided to protect the metallic sheath from corrosion and from mechanical damage due to armoring. It is a fibrous material like jute or hessian tape.

Armouring
Its purpose is to protect the cable from mechanical injury while laying it or during the course of handling. It consists of one or two layers of galvanized steel wire or steel tape.

Serving :  
To protect armouring from atmospheric conditions, a layer of fibrous material is provided. Construction of Cables.

Types of Underground Cables

We learn whats inside an underground cables. Now we going to look about types of underground cable that use in transmission of electricity.

1) SWA (Steel Wired Armoured) cable.

This cable normally used in street light underground wiring or SSB (Sub Switch Board) electrical transmission. This cable voltage rate is 240V/415V.

2) XLPE (Cross Linked Polyethylene) cable.

XLPE cable is used for all range voltage for medium voltage applications. It has thick cable insulation,this is because it widely used in electrical transmission.

3) Oil Filled Cable

  Oil filled cables are used to avoid conductors to have a contact or arcing between cores. This oil is fill in oil duct for it can flow through the duct. This will prevent happening short circuit between cores.

4) Gas Pressure Cable


Although as many insulation cover the conductor, this cable has inert gases that give lost of dielectric and capacitance. Furthermore, this gas carry heat created by the cable.

5) Fiber Optic Cable.


Fiber optic cable usually send data and information to one place to another. So this cable is used to transmit to internet server. This cable known as marine cable because it's  most lay underwater. 

Tuesday, 30 August 2016

How to make three way or Tee junction and four way trunking


We already learn how to make 90° and 45° or 135° angle. This is the final one for trunking. There's lots of way to make variety of angles in trunking. If we master the basics, we will able to make any kind of angles. So now we going to look about how to make tee junction and additional four way junction to trunking. Lets get started.


Tools needed :

Metal cutter
Ruler or Measuring tape
Pencil (for draw lines on trunking)


WARNING : 
BE CAREFUL WHEN YOU CUT TRUNKING,THIS MAY CAUSE INJURIES FROM SHARP EDGES BY CUTTING THE TRUNKING. WEAR GLOVES TO AVOID INJURIES.

To make this tee and four way trunking, I didn't make any measurement for this demonstration.,but when making for house wiring measurement is very important.

TEE OR THREE WAY JUNCTION.

1) Prepare your tools and trunking to make tee. Make sure you have two trunking to make tee.


2) Now cut the one side of the part trunking guided by red circle.
 

 3) Now cut another trunking like the red circle guided. Cut the sharp edges to avoid injuries.

4) Slot the trunking into another trunking into the trunking where you cut the one side of trunking. Now you get the perfect Tee junction trunking.

5) Make a cover for this tee junction trunking. It's easy to make by tracing the length of your trunking. Once you make the cover,put on it.


FOUR WAY TRUNKING

Now we already done the three way junction. To make four way trunking, you need to add another trunking in other side.

1) Cut the other side the trunking and add another trunking and cut the way you cut the three way trunking.

2) when you done cutting the both. Now you insert the trunking into the slot.
   
3) Now make the cover for this four way junction.

4) Put the cover onto the trunking and it will perfectly fit on it. Finally you done making 4 way junction trunking.
  

 NOW YOU ARE MASTER ALL OF THE SKILLS TO MAKE TRUNKING INTO VARIETY OF ANGLES. PRACTICE MORE AND KEEP WORK HARD ON YOUR SKILL TO LEARN FURTHER MORE ON IT.

Monday, 29 August 2016

Types of wiring : Combined wiring


Combined wiring are the most common wiring used every where in domestic and industrial wiring. Even in single phase and three phase. So what's so special about combine wiring ?
We going to look about it now.

Combine wiring consist of Trunking,PVC,Conduit,Flexible conduit,ducting, and so on. This all will become a system as a mechanical and chemical protection. This is where you skill are tested on bending conduit,trunking and PVC. 

The picture above shown is an example of combine wiring. The reason why combine wiring is to reduce cost and give good protection on wires. The wiring is so simple. But the work done is so easy or hard depends on your skill.

The real problem for this combined wiring is installing the wire. There will be so many wire are install in this conduit pipes,PVC and more. Sometimes the wires stuck in these pipe so fishing tape are used to solve this problem.

This fishing tape is easy to use to pull wires without stuck into these pipes. 

1) Insert the fishing tape into conduit where you want to install wires.

2) When the wire come out of the end of the pipe, Hook the the wire with the fishing tape. 

3) Now pull the fishing tape and the wire automatically go into the conduits.


NOW YOU CAN ABLE TO DO COMBINE WIRING BY CHALLENGING YOURSELF WITH YOUR SKILL AND LEARN HOW TO USE FISHING TAPE. GOOD LUCK FOR YOUR EFFORT ON TRYING TO DO WIRING. IF YOU HAVE ANY TOPIC ABOUT ELECTRICAL,LEAVE A COMMENT AND WE WILL DISCUSS ABOUT IT.

Sunday, 28 August 2016

Electromagnetism :Characteristic and uses of DC motor and the DC Motor stater

This is the last part of DC motor. But there's lot more things about DC motor and we will learn about later. Every DC motor has it's own characteristic and uses. This depend on armature current,speed and torque. So we will learn in simple way you can understand and additionally we going learn DC motor stater. Let's get started.

DC Motor has three types of connection. Series,Shunt and Compound. This each connection has it's own connection. Let look it out.


DC Motor Starter

The starting operation of a d.c. motor consists in the insertion of external resistance into the armature circuit to limit the starting current taken by the motor and the removal of this resistance in steps as the motor accelerates.

When the motor attains the normal speed, this resistance is totally cut out of the armature circuit.It is very important and desirable to provide the starter with protective devices to enable the starter arm to return to OFF position.

This stater is manually operate by turning ON and OFF. The purpose this DC starter use is to give overload current and short circuit protection. Although the technology develop, this starter is not use. Bu this is the basic for every DC and AC motor starter. 

There's types of DC motor starter.

1) Two point starter
2) Three point starter

3) Four point starter

Friday, 26 August 2016

Kirchhoff Voltage and Current Law.

After so long we going to learn law that no need to follow in your country,but need to apply in electricity to find out the value of voltage and current. This dude as the picture above shown is a Gustav Kirchhoff who a German scientist contribute to electrical circuits and make a concept of law that we called till today is 'Kirchhoff Law'. 

Kirchhoff law has two law. One is Kirchhoff Voltage law and another is Kirchhoff current law.

  • Kirchhoff Voltage Law (KVL)
In Kirchhoff voltage law states the sum of all voltage around the loop is zero. Means when you sum all the value of voltage of a circuit around the loop,the end result is zero.

Formula : 0= V1+V2+V3.........


  • Kirchhoff Current Law (KCL)
In Kirchhoff current law states that The sum of current flows to node and flow out to node are zero.

Formula : 0= I1+I2+I3..... 
 

WE WILL DO SOME EXAMPLES IN NEXT POST. SURE THIS POST WILL MAKE YOU UNDERSTAND.

Thursday, 25 August 2016

Install correct size of wires to electrcal accessories

Wires comes with different variety of sizes with depends on current rate that flows through a conductor like copper or aluminum. Every sizes of wires have it's own electrical accessories to fix in it. So why does it important to fix the right wires with electrical accessories depends on sizes. So let's find out!!!


As the picture above shown is the current rate with different size of wires. A small wires need small amount of current. A larger current need big wire. So this is why we choose a right wire with size to install electrical device. Lets look at the loads to fix right size of wire.

1) 1.0MM 1.5MM
Loads like light bulbs are need 1.5MM wire. because this wire carries small amount of current to power light bulbs.

2) 2.0MM-2.5MM-3.0MM

Sockets with install MCB with amperage 16A-20A normally used 2.5MM wires.This wire need a amperage about 13A-16A to power loads like table fan, blender and so on.

3)  4.0MM-8.0MM

 
 Loads like air compressor,air conditioner, drilling machine needs a large amount of current. So sockets with install MCB 32A to above need to wired 4.0MM to 8.0MM.
 
4) 8.0MM-16.0MM
16.0MM wire is a SWA cable (Steel Wire Armour) from a switch board to reach your home to power you home. In that SWA cable has 16.0MM wire size of three phase system. This wire connected to cut out to the (KiloWatt Hour meter) kWh meter. IN other way technician you 8.0MM wire to install the both appliance. This appliance need large amount current,so this size of wire is support it.

Wednesday, 24 August 2016

Types of electrical connectors

Sometimes screwing wire isn't enough. We need something good in griping wires so can avoid accident by short circuit itself. it also can extend wires for wire to any other electrical device. So we use electrical connectors for all those functions. There's many types of connectors that you should know, So lets check it out.

1) Crimp insulate connectors
This connectors usually found in air conditioner electrical system or any electrical wiring. This connectors give a good grip to wire to conduct electricity with PVC insulate.

2) Plastic insulate brass connectors
You can always find this connector everywhere from connecting wound wires and screwing wires to power your new electrical appliance. This is a simple connector just need a flat type screw driver to connect wires.

3) Wire insulate screw cap
Well you can say this is a connector to but not safe as the other connector as I mention before. Because this cap can easily come off. So this can be used for temporary when doing some maintenance on electrical wiring.

4) Electronic pin out connector
This connector usually can found in electronics like computers mother boards, GPS module and so on. Electronic components have many terminals and not every electronic components are solder in PCB (Printed Circuit Board). So this pin out connector is used to connected electronic components so it can be easily disconnect and replace new one if damages occurs.

5) Brass Connector  
Do you think this connector is safe? Nope but yes sometimes it use for additional bus bar connection for distribution board to add some wiring connections. Some it use for plugs,sockets. You can insulate it with PVC layers or just wrap around with electrical insulation tape.

Tuesday, 23 August 2016

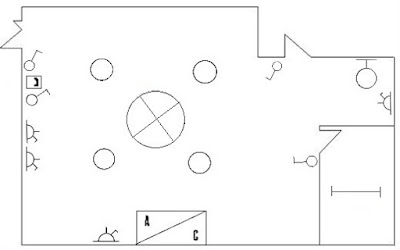
How to draw symbols on floor plan for electrical.

In electrical wiring, we not only draw schematic wiring,but also draw electrical symbols in floor plan. Floor plan is like a blue print for what the building look like with electrical system. So engineers draw floor plan before start wiring project to clarify how the electrical system is going to be. So we are going to draw a simple floor plan so you guys can understand so lets get started.

We going to do floor plan based on a room. As you a room owner, you need to think how many electrical accessories need to be install. For this room as the picture below shown,the electrical accessories need to be install is :

Electrical accessories :
4 Down light
1 Ceiling fan
1 fluorescent light
1 globe light

Switches :
4 one way switch
4 socket 

We now know what electrical accessories we going to install,so now let draw symbol on floor plan.

First step : 

Just imagine you are the owner of this room. So you need to figure it out where the electrical accessories are going to be install. So based on the picture, The big area of the room,the electrical accessories are going to be install is 4 down light,1 ceiling fan. The other small area on right side is 1 globe light. The 1 fluorescent light is install in another small area on right below side. Air conditioner is install in below the room.

Second step :

After draw symbols on electrical accessories,now you going to draw switches and sockets for this room.To draw switches, you need to draw beside the door of the room,because the room user can ON and OFF with comfortably. For sockets, you can choose any where in room to install sockets.

Third step:

Now you going to do wiring for this floor plan. To do wiring for this is easy,because you only going to wire switches only. Not for sockets and electrical accessories above 32Amps.
You need to draw wiring with dash line so it can easier to detect where the wires go.


Now the floor plan is complete with electrical accessories,switches,sockets and the wiring, This is only for beginner There's more hard in larger scale of floor plan,so practice drawing floor plan with the person who expert on this. Good Luck with your hard work.